ASP.NET Core WebDAV Server Sample with Azure Blob / Data Lake Storage Back-End
This is a Class 2 WebDAV Server that keeps data in Azure Blob storage with Data Lake support. This sample publishes a hierarchical folder structure from Azure Data Lake and keeps locks, custom properties as well as file creation and modification dates in Azure Blob properties. It is using Azure AD authentication and Azure Cognitive search for the full-text indexing and search.
This sample can be created and deployed to your azure account automatically using the Azure WebDAV Wizard.
This sample is provided as part of the IT Hit WebDAV Server Engine v10.1 samples and later. You can download it in the product download area here and well as it is published to GitHub. To automatically update your Azure AD App Service running this sample you can use this repository.
All locations contain identical code.
Prerequisites
- .NET Core 3.1 or later version on Windows, OS X, or Linux.
- Microsoft Azure account.
Setting the License
To run the example, you will need a valid IT Hit WebDAV Server Engine License. You can download the license in the product download area. Note that the Engine is fully functional with a trial license and does not have any limitations. The trial license is valid for one month and the engine will stop working after this. You can check the expiration date inside the license file. Download the license file and specify it's content in License field under DavEngine in appsettings.webdav.json file.
You can also run the sample without explicitly specifying a license for 5 days. In this case, the Engine will automatically request the trial license from IT Hit website https://www.webdavsystem.com. Make sure it is accessible via firewalls if any. After 5 days the Engine will stop working. To extend the trial period you will need to download a license in a product download area and specify it in appsettings.webdav.json
Creating an Azure Blob Storage with Data Lake Support
-
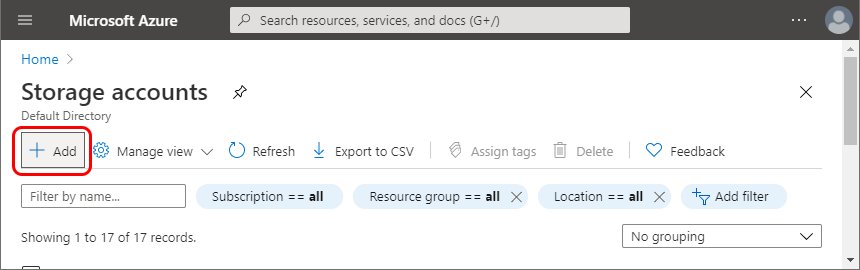
In your Microsoft Azure account go to Storage Accounts. Select Add:
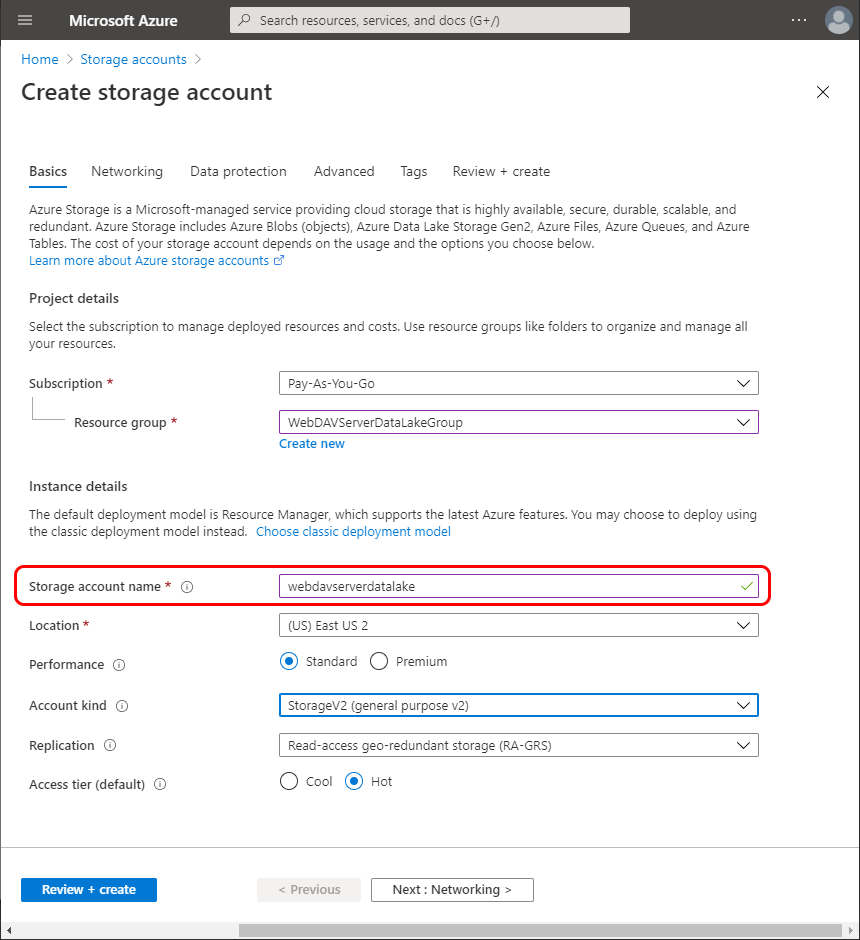
Fill the Storage account name field, you will specify it in the config file:
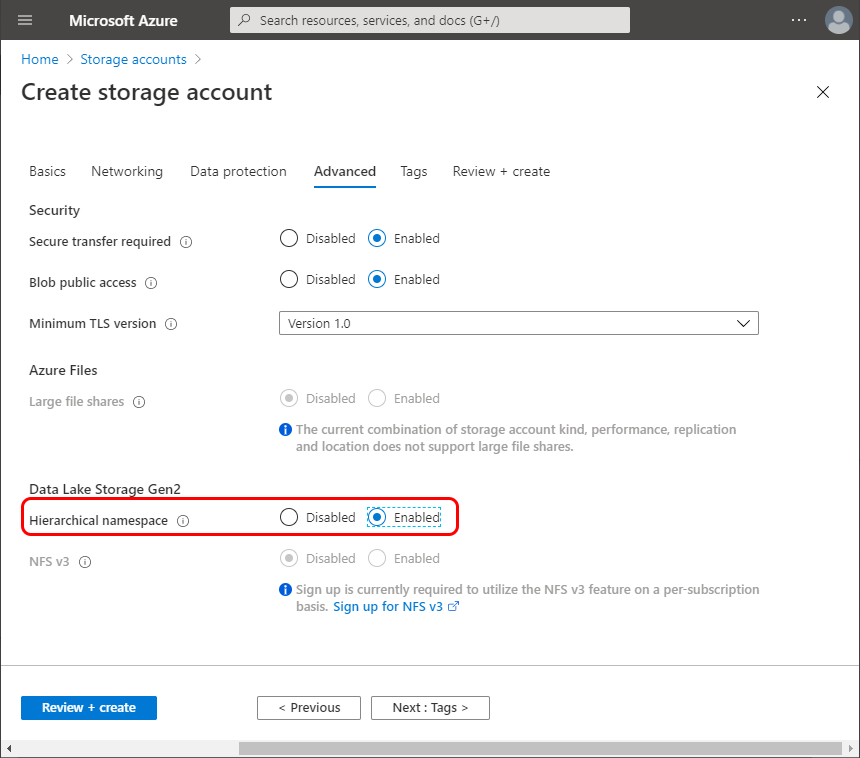
Go to the Advanced tab and enable the Hierarchical namespace under the Data Lake Storage Gen2:
Select Review+Create. Confirm the storage account creation.
Specify the storage account name in appsettings.webdav.json as AzureStorageAccountName setting value.
-
Go to Containers under the Data Lake Storage. Select +Container to create a new container. Fill the container name, you will specify it in the config file:
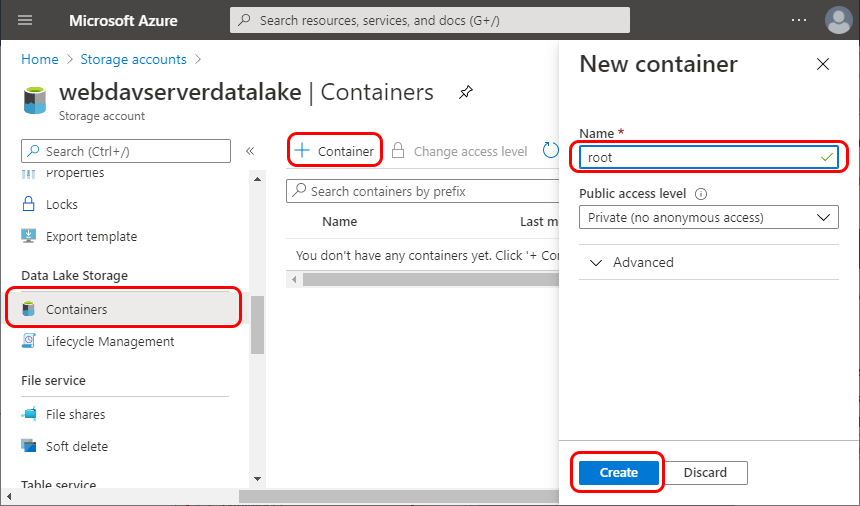
Confirm the new container creation.
Specify the container name in appsettings.webdav.json as DataLakeContainerName setting value.
Granting the App Permissions in Azure Data Lake
In this section we will register the application in Azure AD and grant it permissions in Azure Data Lake.
-
Navigate to the Overview in the Azure AD directory:

Copy the Primary domain field and paste it into the Domain field in appsettings.webdav.json.
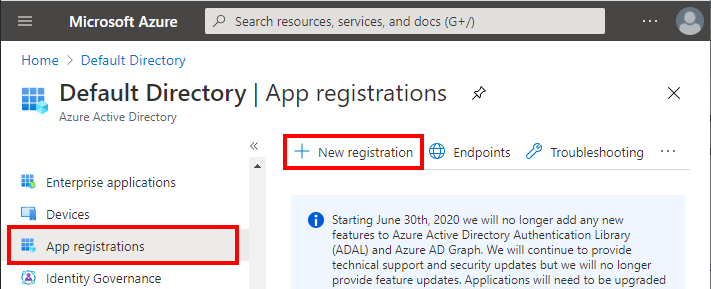
-
Navigate to Azure Active Directory -> App Registrations. Select New Registration.
-
Enter the app name. You MUST also enter the Redirect URI. Confirm registration.
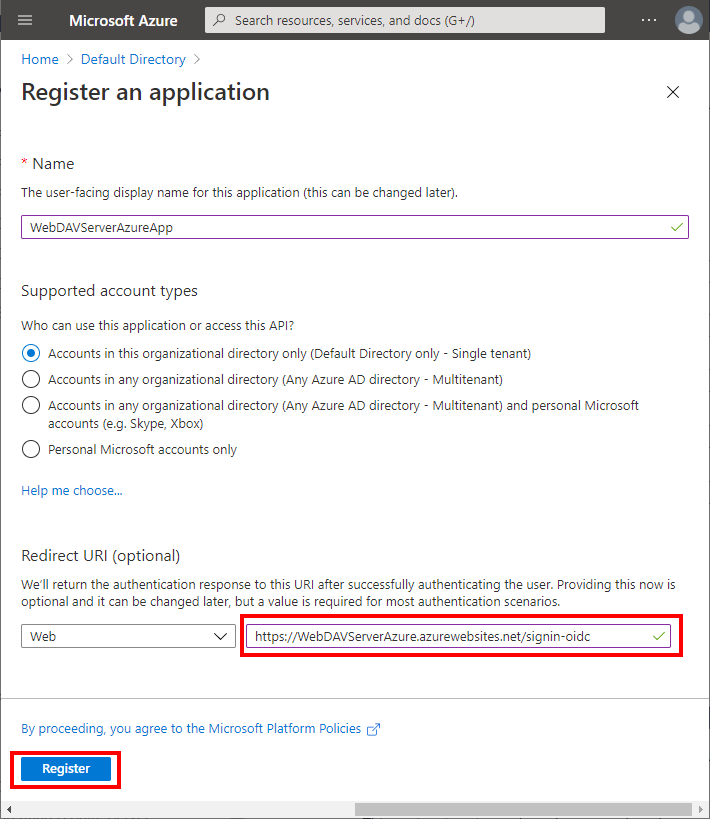
Note that in your project in appsettings.webdav.json you already have "CallbackPath": "/signin-oidc" setting specified. The path in the Redirect URI must match, but you should NOT change it to a full URI in setting.
-
Open the newly created app registration.
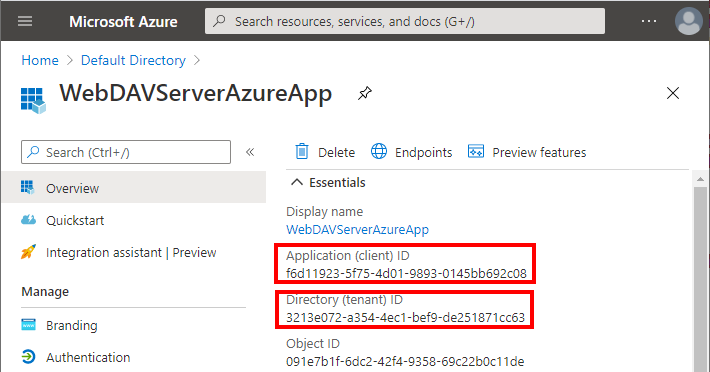
Copy the Application (client) ID and Directory (tenant) ID fieds and paste them into ClientId and TenantId settings in appsettings.webdav.json.
-
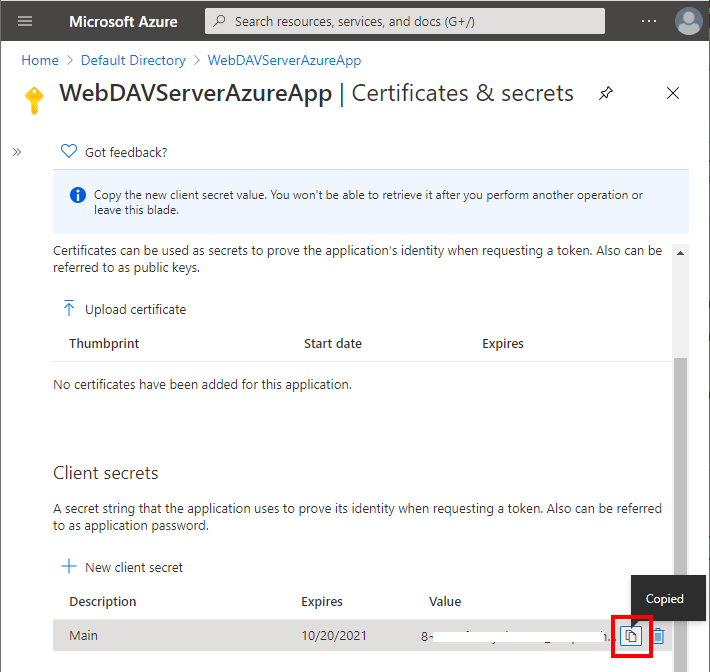
Navigate to Certificates & secrets. Select New client secret. Enter the secret name and confirm client secret creation.
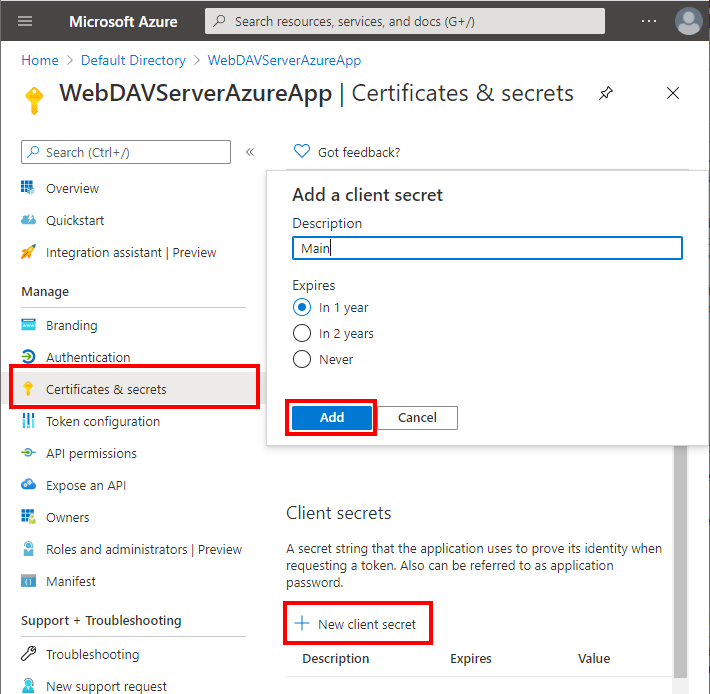
Copy the newly created secret value and past it into ClientSecret setting in in appsettings.webdav.json
-
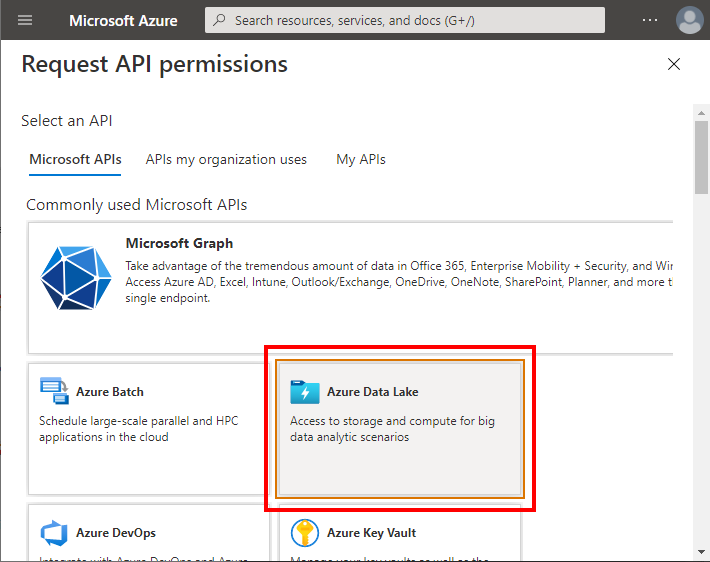
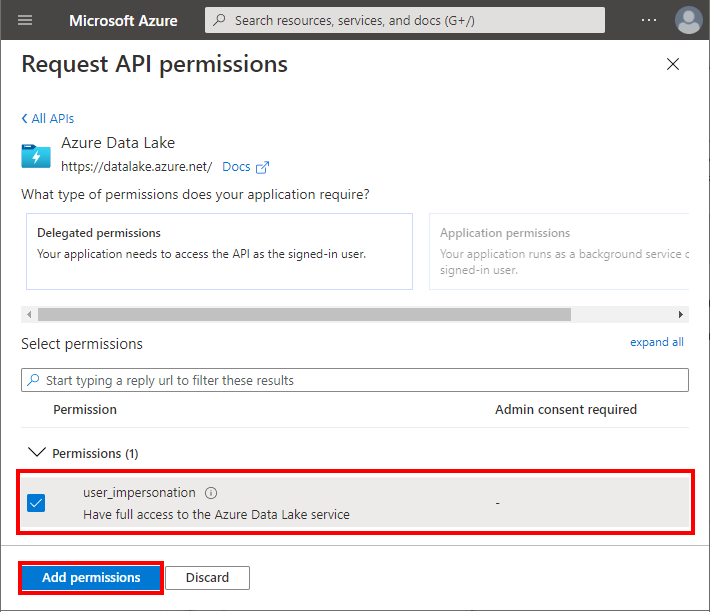
Authorize the application to call Data Lake API. Go to API Permissions in the new application. Select Add a Permission.
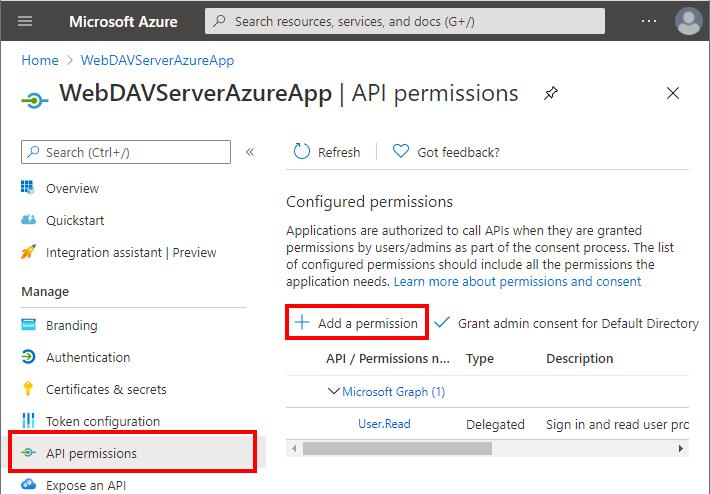
Select Azure Data Lake.
Check user_impersonation. Confirm adding permission.
-
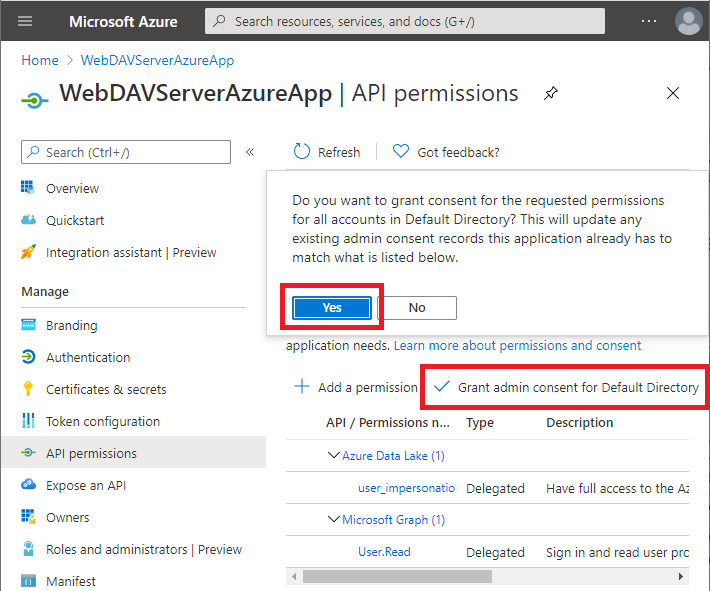
Select Grant admin consent:
Granting Permissions to Azure AD Principal in Azure Data Lake
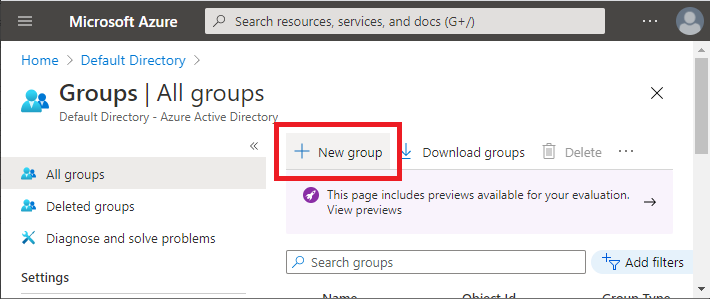
In this section, we will create a new Azure AD group and will grant it permission in Azure Data Lake.
Granting Permissions on Azure Data Lake Root Container
Every group or user that must have access to the Azure Data Lake must first be granted permissions at a root container level.
-
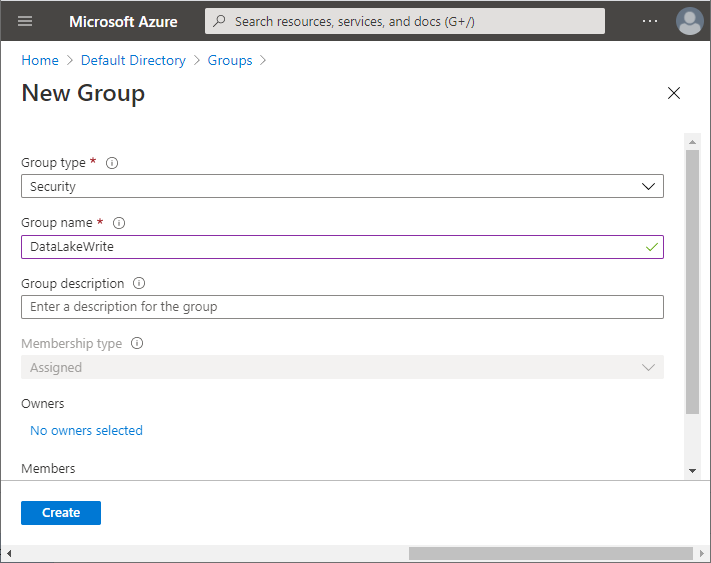
Create a new Azure AD group. Go to Azure Active Directory -> Groups. Select New Group.
Enter a group name and confirm group creation:
-
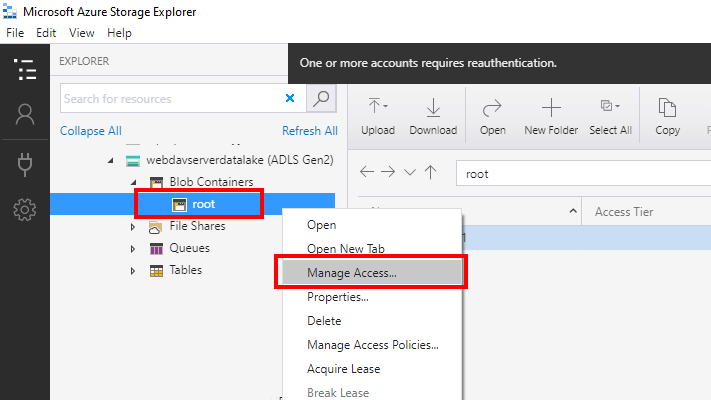
Give Azure AD group access to the root Azure Data Lake container. Note that this operation can not be done via the Azure web portal. To do this you must use the Microsoft Azure Storage Explorer.
Select Azure Data Lake container and select Manage Access in the context menu:
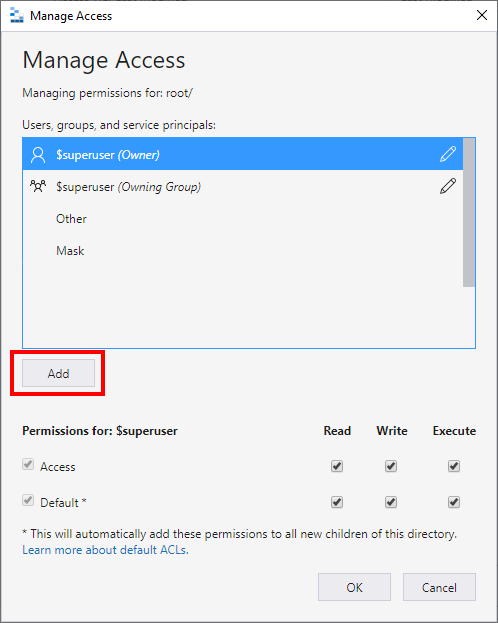
Select "Add":
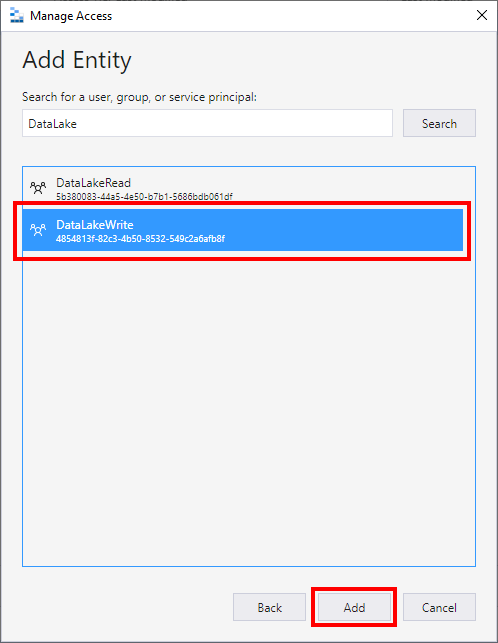
Select group to add:
-
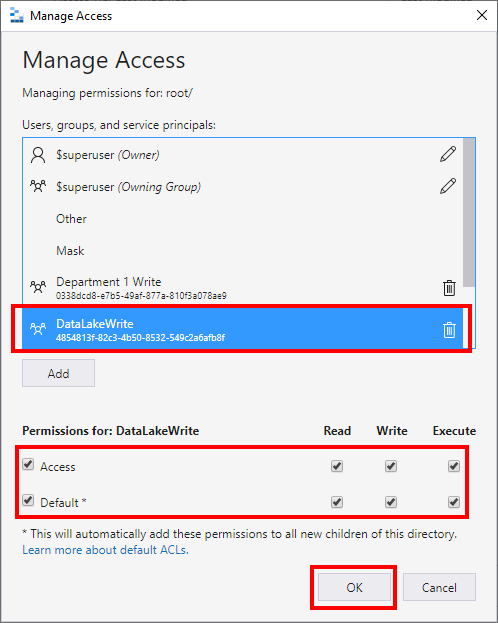
Grant permissions in Azure Data Lake on the root container. To grant permissions to read files and browse select "Read". To grant permissions to modify files, upload files, create folders, and delete files and folders select "Write". For the user to be able to list the content of the container or folder select "Execute". To make sure newly created folders in Azure Data Lake copy ("inherit") permissions from the parent object select the "Default" checkbox:
Granting Permissions at a Azure Data Lake Folder Level.
Now, when you have added permissions on the Azure Data Lake root container, you can create folders and files under the root container and grant permissions on them. Unlike with the root container this can be done via Azure web portal. Note that the group must be already added at the root container level, as described above, via Microsoft Azure Storage Explorer.
-
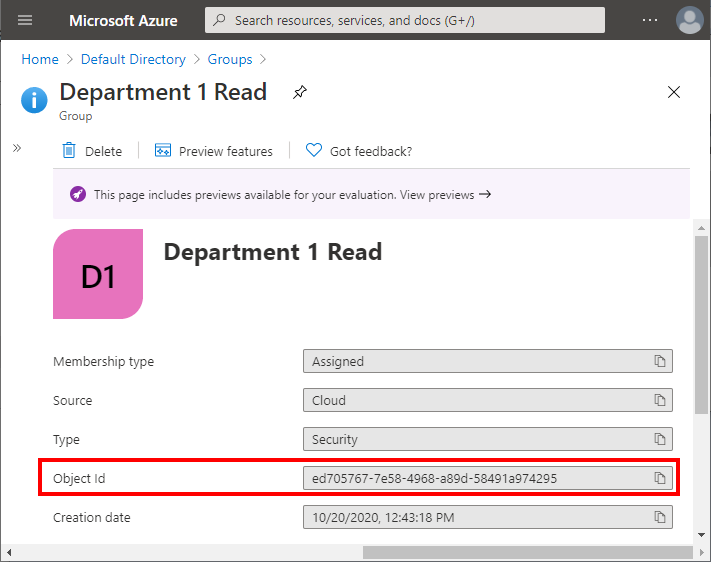
Find the Azure AD user or group that you wish to grant permissions and copy it's Object Id:
-
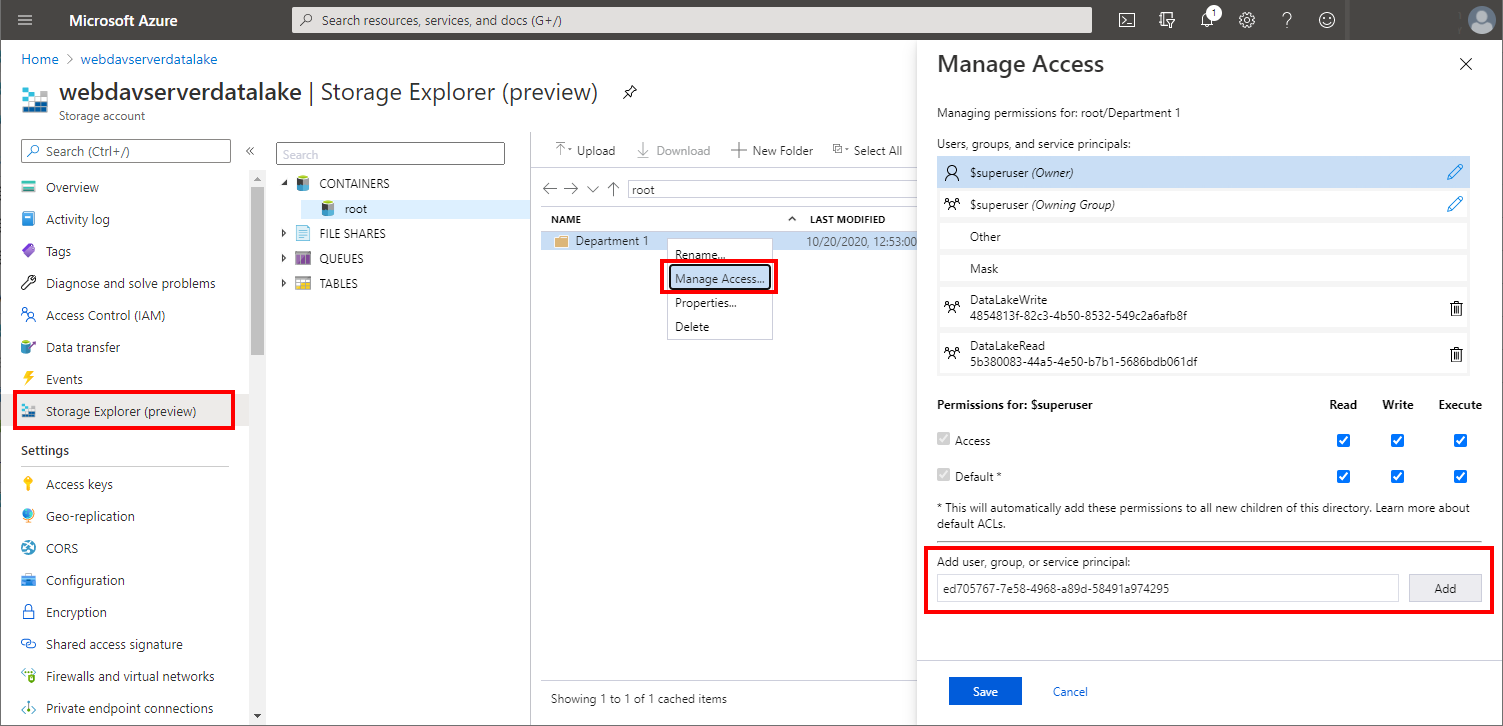
Go to Storage Explorer. Select the folder or file on which you will grant permissions. Select Manage Access. Enter the copied Object Id to 'Add user, group or service principal' field. Select Add:
-
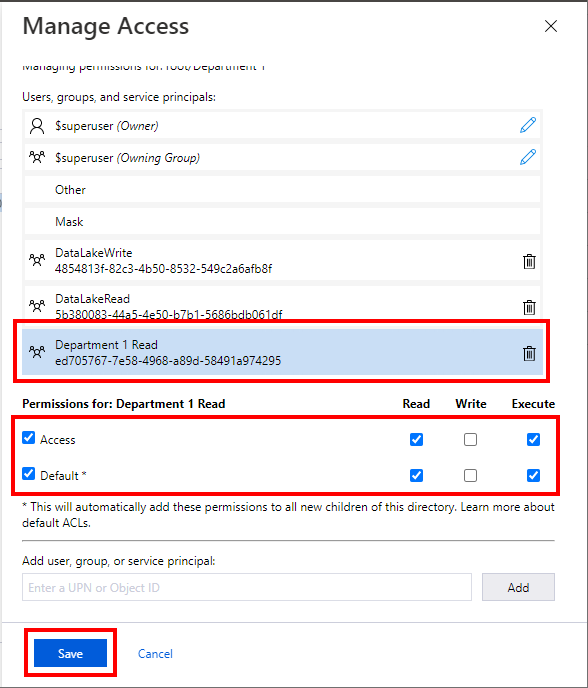
Select permissions that you wish to grant. here you will typically select "Default" for the permissions to be copied to the subfolders and files. Select Save:
Publishing the Project to Azure
Note that this sample provides optimal performance when deployed directly to Microsoft Azure.
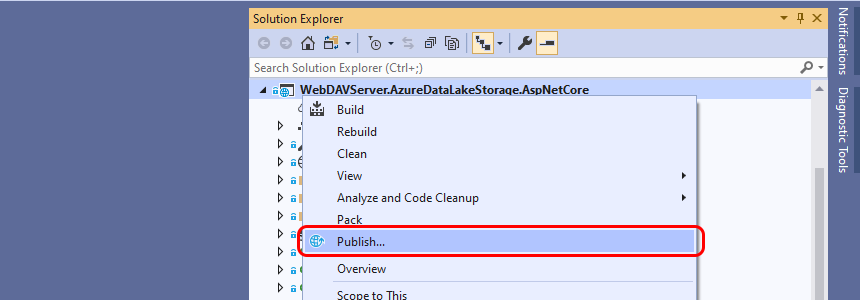
If you are using Visual Studio you can publish the project to Azure from the Visual Studio project context menu:
To publish as an Azure App Service select the App Service option:
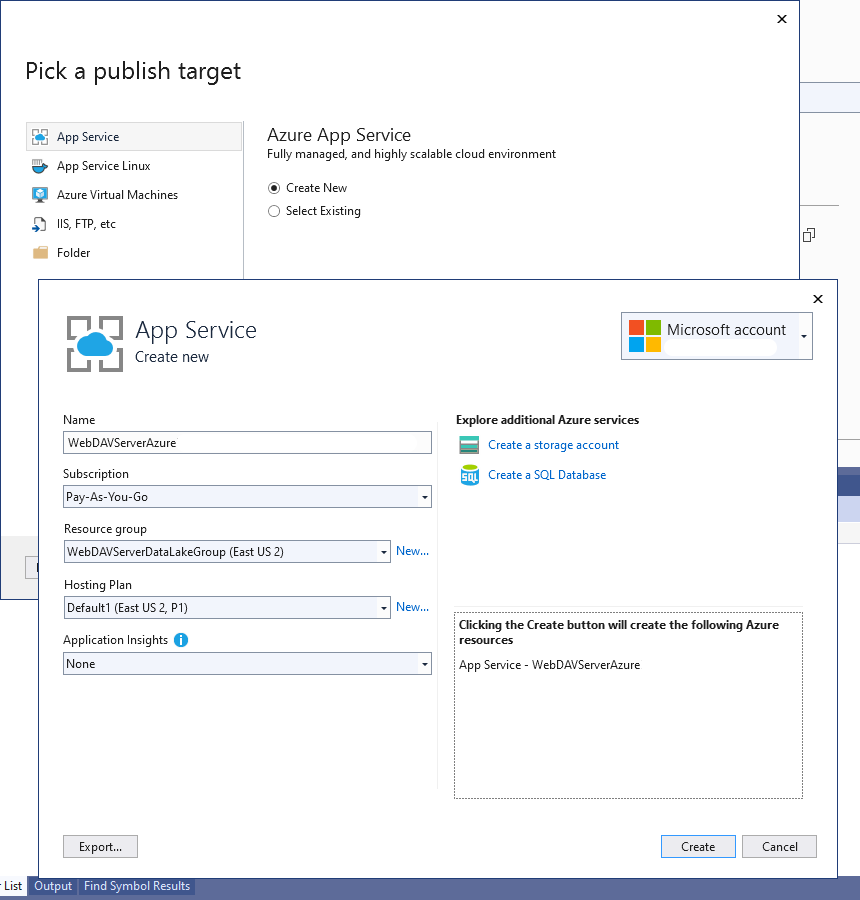
Note that you do NOT need to create a storage account in this wizard as you have created and configured it on previous steps.
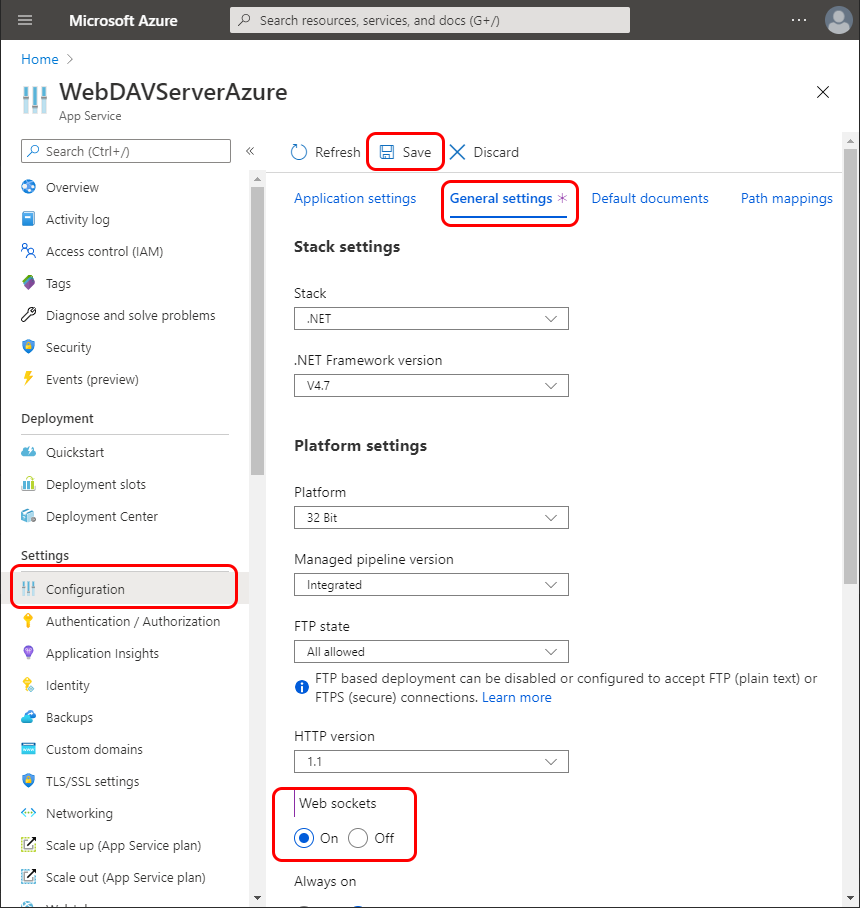
Enabling Web Sockets
This project is using web sockets to update the user interface when any data is modified on the server-side. If you deploy your project as an App Service, by default web sockets will be disabled on the newly created app. To enable web sockets go to App Service Configuration and enable them on the General Settings tab:
Now you are ready to run the application. Open a web browser and navigate to https://<yourservicename>.azurewebsites.net: